HOME |
ENGINE ROOM |
HOME |
ENGINE ROOM |
There are those that yawn and those that eat it up. This page is for the latter group . ~~~~~~~~~~~~~~~~~~~~~~~~~~~~~~~~~~~~
Refrigeration
Autopilot & Instruments
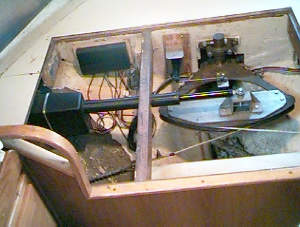
Our Autohelm Autopilot/Navigation system is now complete. There was a lot of debate between brands - chiefly Autohelm, Robertson, and B&G - and we chose Autohelm in the end largely because we were familiar with their Seatalk system principles from Whisper. TacklessII's system is a newer generation, with ST80 instruments where the exchange of information between instruments is all two-way rather than one way. The senders (like depth sensor, speed paddle wheel, wind instrument, fluxgate compass) are all linked to the display/autopilot controls by a daisy chain of very thin wire! We have only one dedicated display, for wind, while the others are capable of displaying any piece of information that the system has to offer, including all sorts of position info via a NMEA interface to our GPS. Built-in programs convert/compute the information gathered into various presentation pages. For example, the depth "chapter" has a "page" that displays a depth histogram for periods from 10 minutes up to 24 hours. This is useful for checking out shorelines for dive possibilities or for learning what the bottom in your anchor radius looks like. Or you can punch the wind data up in knots, miles per hour, or by Beaufort Force (the very classical system of categorizing wind speeds by how the sea surface appears!) How nautical! We even have a remote control that we can have inside the boat in bad weather, or in the aft cabin at night so we can keep tabs on wind speed, depth, even position while anchored in uneasy weather.
or the autopilot drive system itself, we debated between linear and hydraulic drive, opting in the end to stay away from hydraulic, since the tech rep explained that, out in the middle of the ocean, if the hydraulic system breaks, there's nothing you can do to fix it. Every autopilot installation is necessarily unique. The manual presents a bunch of parameters that have to be met, but it's up to the installer - in our case ME - to devise how he's going to meet those parameters and still fit it into his boats back end! We had received several different quotes on installation packages and I did not like any of them. Aside from the $$$$'s, I would really have no true understanding of the way it was installed or wired, so when things started going wrong (and we talking boats here) a few hundred or thousands of miles from the tech rep. I wanted to know how it was put in. Sooooo, out came the manual, the pieces and my glasses. Wiring was fairly straight forward and simple with the color codes for the wires and connectors, location of the big lumps was a little trickier. The motor and shaft were the biggest problem. Shaft had a maximum travel of 17 inches and had to mounted to move the rudder equally in both directions to get the maximum amount of rudder travel without hitting the internal stops of the shaft itself. This meant the motor foot had to be about 33 to 34 inches from the center of the rudder quadrant and attached to the hull in such a way as to hold a thousand pounds of thrust from the resistance of the rudder in some god awful conditions sometime down the road. This put it very close to the same locker that we store the spare C cell batteries and well past my West Marine 2 part epoxy expertise. No problem-I walked into the workshop of our local fiberglass guy and say-I have a problem!! Several days (and several hundred dollars) later I have one of the neatest installations you have ever seem. A mounting block designed by the fiberglass guy (only a "block" by some definition-one flat surface to bolt on to, several curved surfaces to glass to the hull), was glassed on the hull to start with and then glassed over before 3 different length lag bolts were used to "secure" the foot of the drive motor. As we stood and admired the glassed-in block and lagged-in motor, I asked him, "So Mike, how much thrust to you think the block will hold with all that glass under and over it?" "A lot," he said as he finished his beer and handed me the bill. It does look nice!! The Mast
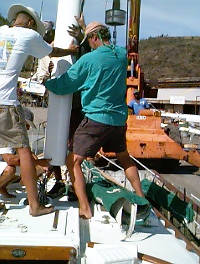
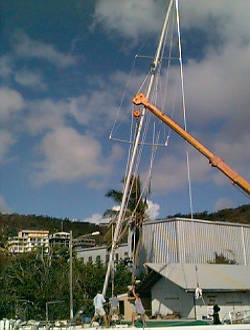
Next big project was pulling the mast. The motivation we started with was to mount the radar and TV antennas, along with new masthead instruments, to run all pertinent wiring and cables in nice quiet conduits, to add new halyards by splitting the masthead sheaves and running the working ends internally, and to do repairs work on the spreaders as cited by surveyors. . The mast is back in, but we did none of those original objectives. We didn't mount the radar or the TV antenna, because we decided the existing mount above the staysail put way too much weight and windage way too high, and TII, being tall-rigged and shoal draft, doesn't need any extra weight or windage aloft. (Whisper, now sold, had the radar below the staysail halyard, but that, of course, offered resistance and chafe to the staysail every time we tacked.) More about radar later. We didn't split the halyards because it turned out the mast was stuffed with blocks of foam! That did in the conduit idea, too. And we didn't do anything to the spreaders, because once we got it down, the riggers said there was no problem. Go figure!
Pulling the stick started out to be even more exciting than we'd bargained for. The hoist operator attached the crane a bit too low, and the mast when it emerged from the cabin top careened more than we anticipated. A cable came free, missing Gwen by feet and smacking one of the salon windows. (Another project area we got to learn about!) The mast came out with all rigging still attached, including the furler, but as the furler is longer, someone has to be detailed to keep the lower end out of trouble. Once the mast was down on barrels we detached the furler and wrapped it in one long piece of saran wrap to protect it from dirt and paint where it rested on the ground. This worked very well and held up for three weeks.
We rewired all the lights with tinned wire (#12 in duplex and triplex runs, with a single #10 for the ground for the tricolor; all wire removed was #14), adding spreader lights, a new deck/steaming light combo, and a new masthead light (the old one worked, but crumbled in our hands as we tried to remove it). We rain the new wire with messengers in the courses of the old wire, working our way around the foam blocks. We also ran new coax for the VHF antenna since we were there, even though it probably wasn't needed. On top we mounted a Windex and a new wind instrument (Autohelm ST80 which sticks UP 3'!...Good thing we're not headed for Floridal!) By this time we'd formed a nice working relationship with a young freelance rigger named Nils. Nils is the type of adventurous young person you see hanging from the mast-tops on video clips of ocean racing boats! Other than trying to talk us into equipment that might make TacklessII a candidate for the America's Cup, his knowledge and expertise were very useful.
New equipment added while the mast was down was a Firdell radar reflector above the staysail , plus track and fittings for a Forespar whisker pole (15'-23') Our westward bound cruising friends report back that it's essential to keep that genoa poled out on those long downwind passages. We'll have to practice here in the Channel since there are no downwind passages in our itinerary until we head west from Trinidad! We also added a gate in the sail track above the head of the mainsail and Cradle Cover to allow running up a storm trysail on the same track. A gate for that purpose was already there, but the full-batten main stacks higher on the boom than the original sail. We are already sorry we didn't bite the bullet and put on a separate track for the storm sail, and we will probably do this in Trinidad, hanging from a bosun chair and cursing the squandered opportunity to do it easily when the mast was down! In the cosmetics department, we had all spars painted to match the boat - oyster white Awlgrip. Looks so nice I, I can't even remember the gray! We removed virtually all the fittings for the painting, and when replaced, all were backed with electric tape and all screws coated with Teff-Gel. Unused holes were cleaned out, scored and filled with Marine Tex. Before puttiing the mast back in, we replaced those first two blocks of foam that we'd managed to extract before we realized they went all the way up. After all, the system did work; TacklessII has always had a very quiet mast. Restepping the mast went much more smoothly than pulling it did, as we were careful to have a better pickup point and all cables were better secured. An observation made by Pieter Stoeken is that TII's mast sits in a cup with two locating slots fore and aft, whereas on most CSYs the mast fits over a male extrusion. Because our cup is made of aluminum there was no electrolysis at the mast step. (We did not fail in the nautical tradition of stepping the mast over a silver piece...in this case a Susan B. Anthony dollar!) Another nice touch by our rigger was covering all the safety nuts and pin ends with Boat Life the night before stepping the mast. The trick is to use a soapy finger to shape a neat job. I ended up reusing the old layered mast wedges around the mast at the cabin top, topping it with an 1 ½' layer of Spartite on top. I first used Spartite after Marilyn to solve a perennial mast leak I had, and we've been very happy with the product. Window Replacement Rigging
We were very impressed with the knowledge and insight of the young rigger Nils, so recognizing a good thing, we kept him on to splice the new wire and line for TacklessII's running backstays. The old ones had been in storage for five years, unused since I'd take off the staysail gear. When we excavated them from storage, we'd found them in a sorry state. Stuff just doesn't last, despite being unused! Nils also helped devise all the halyards, blocks, and guys required for using the whisker pole, and helped us figure the dimensions and positioning required for a new preventer/vang. We opted for a basic Lewmar 4:1 Tackle, not for lack of Nils trying to convince us we needed the $1000 rigid one vang. Every once in awhile we had to have a reality check with Nils and remind him we're a fat old cruising boat, not a race boat! About this time Gwen came up with the proposal that if we were to take on two weeks of charter, we could use the money to pay someone to do all the teak, "someone" being a team of hardworking gals in constant demand for varnishing projects around the yard. TacklessII's brightwork was in sorry condition after all this time. I allowed myself to be persuaded, and the truth is we never could have made the time to do the great job the "girls" did, and we learned a bit watching them. They used chemical stripped to take off the old Cetol before sanding. Then we put three coats of color topped with two coats of the Cetol gloss. The end result looks like varnish, but lasts longer and is easier to touch up. Radar
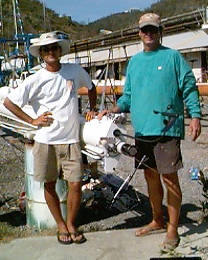
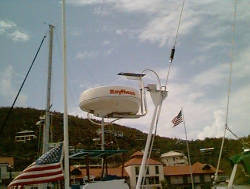
Meanwhile, you may ask, what did we end up doing for radar? Gwen pored over all the pros and cons of all the different radars on the market - mostly between Raytheon vs Furuno, CRT (TV-like) vs LCD (computer-like), 2Kw vs 4Kw, and old model vs new product - plus all the different mounting systems - from back-stay levelers, to pole mounts, back to mast mounts. We ended up choosing the new product, the Raytheon Pathfinder Raychart LCD with the 4Kw transmitter. Our rationale: Raytheon will interface with the Autohelm Seatalk system (also a Raytheon product) most easily; the LCD screen (now much improved over earlier models) is smaller, lighter, and waterproof and therefore can be mounted in the cockpit which is really where radar has always needed to be, and because it is essentially a computer screen it can do many other things, like display charts, display Seatalk data, or all three at once (once we figure out the buttons, that is!); the 4Kw penetrates weather better than the 2Kw (we'd heard of target showing up through rain only at a distance of one mile…too close!) and while it does use more power when scanning, it isn't 2x the power; there enticing deals on the old familiar CRT model radars and we came close, but what we discovered in the nick of time was that service support for them was being phased out!
The Waltz mounts parallel to the backstay, in our case aft of the stay, with a mounting that straddles the chainplate. Because we went with the 4Kw's large dome, the platform necessarily faces aft, else it could foul in the topping lift. The platform is designed, however, so the dome is still oriented forward. Tom Betts, the maker of these systems, customized our platform to have a TV antenna station above the radome. His willingness to work with us was really great, although unfortunately it hasn't worked with the antenna we'd bought (the large Shakespeare) due to interference by the required loop of radar cable. We may make it work yet with a smaller antenna, or we may mount a smaller antenna up on the mast somewhere. Meanwhile…anybody want to buy a 24" TV antenna? Engine/Transmission
Maintenance
Everything went back together,
looking good, but on first start up made a terrible noise. Pulled
the back (gear reduction) section off without pulling the entire tranny
and found a "spacer" that should have been replaced the
first time. That took care of the noise, but the next day the gears
would not engage at all. This DID require the whole thing to come
out again. Front pump had worn enough to lose it's "prime"
and had to be replaced….. Shade & Solar Panels
One of the best investments we made on Whisper prior to our down-island trip in 1997 was canvas awnings to zip into the bimini. On charter, people are here for the sun, but down island, especially in the summer, the sun and heat become relentless. TacklessII's bimini is fairly open all around the cockpit, so it was very important we deal with this. Many cruisers build an awning to cover the whole deck, often turning the boat into a big dark cave. At this point we wanted something to cut glare, provide shade, but still allow us to mount solar panels on the bimini. Dave Livacz of Neptune's Loft here in St. Thomas stepped into make a sip-in awning system that surround the cockpit with five shade panels, including a large one that extends forward to the mast and shrouds. The four side panels roll up like the plastic rain windows and a second zipper track allows both to hang in place at the same time. A side benefit of this system is that the weight of the rolled panels stops the flap of the weather cloth. The side panels clip out to the lifeline with plastic pinch clips, a much better solution than the velcro we had on Whisper's . With the walk-thru's high coaming, this does not inhibit coming and going from the cockpit the way it would on the walk-over, plus we usually just leave one panel on the less sunny side rolled up. Staysail The Water Maker Down island the water actually gets cheaper, but access is reduced, plus you are never as confident of the source. Once we head west, especially in the South Pacific there may be no place for weeks and weeks to water down. Reverse osmosis water makers are now almost standard equipment on cruising yachts. There are dozens of models to choose from, both 110volt and 12volt, and with the new generator there was a strong argument for the former on basis of cost and efficiency. In the end, however we chosen the Spectra, a 12volt system that is drawing rave reviews for his amp/gallon efficiency. Marketing specs say it will make 200 gallons a day (24 hrs.) on a DC amp/gallon (funny they don't say "for 200 amps per day"). Ours is a modular system that can installed throughout the boat so you have the opportunity to see several different compartments several different times during the installation. The bulk of the equipment is located on the starboard side (right) of the main salon. The 43 inch membrane is under the settee and on top of the water tank. Clark pump (high pressure), both prefilters, product gauges, system pressure tank, and selector valves are behind the settee in what used to be a storage locker. Intake of the saltwater is forward with a T fitting off the forward head intake (not the best place recommended but the only place available without a new thru-hull below the waterline-which is really tough to do while still in the water!!!). Saltwater is then routed under the cabin floor by way of a series of Y valves and a feed pump to the high pressure pump and the membrane. From the membrane the product water flows through a hose to the galley sink for "purity testing", once it test OK, then a Y valve is switched and it flow directly into the water tank through the existing vent hose, the extra "brine water" is discharged out a hose running through the engine room to a thru-hull fitting above the water line (again using a hole all ready in the boat). System is about 80% hooked up now, and it will probably be completed somewhere along the way in the first couple of weeks. Even if I can get it done here in the slip, there is no way I want to turn it on in this water (harbor). There are about 28 different water connections, both high and low pressure. It has been my experience that I have a chance of fixing at least 14 leaks upon start up, most of which will not be very accessible once the whole system is in place. So a delay of start up is something I may work at as long as the first 150 gallons last!! Once working, our plan is to make water about every 2 or 3 days for a couple of hours. With the manual freshwater backflush system they say we can go about a week between production times, but 3 days seems to be the norm for most people we have talked to. I will be nice to have the availability to wash the deck, windows and dive gear with good water and still not have to worry about the next stop to "buy" water. Should we need to shut the system down for longer periods, then a "pickling procedure" is done and it can sit unharmed for months. |
|
home
| waypoints | logbook | reference shelf
|

 "Boats is boats is boats" which is
daughter Tiffany’s reaction to a time-honored, unavoidable phenomenon that happens
when any boater gets an audience: the parts stories, the maintenance sagas, the epic
dramas (and comedies) of boat projects. "No shit, there I was…" is much
less often the prelude to a storm at sea, than the opening statement of a tale of man and
his wrench.
"Boats is boats is boats" which is
daughter Tiffany’s reaction to a time-honored, unavoidable phenomenon that happens
when any boater gets an audience: the parts stories, the maintenance sagas, the epic
dramas (and comedies) of boat projects. "No shit, there I was…" is much
less often the prelude to a storm at sea, than the opening statement of a tale of man and
his wrench.